So you want to put a skid plate, bumper, or both on your Honda, but you are concerned your bumper might tear off the questionable stock unibody bumper mounts when subjected to offroading/winching, and you want your skid plate to be able to handle anything. Well look no further.


 Anyways, weld a couple pieces at an angle and run them up past the rad support so it's protected. You will want crossbars welded across the top and bottom of this section, I only welded a bottom crossbar and regretted it, more on that later. This little 6" section of metal will take the most beating out of any other point in your car, so take the time and make this strong.
 Personally I am trying to keep this build semi-stock looking so as to attract less attention on the roads, so I just used the stock bumper, taking off the bumper cover before I ran the tubes up and across (yes that's the same pic again, different subject this time. Focus darn it.)
 Welded that bad boy together:
 And ended up with this:


 That's how it looks with just the bare steel bumper welded up, but with a little cutting to the plastic bumper cover, I ended up with this:


 Test fit to make sure everything looks OK:
 It actually doesn't look horrific, not any worse than the rest of the car in any case.
 As you can see, this one was kept simple and tiny. I wanted to give my wheels the best chance at biting into things that they could. It could be easily added to with some additional metal covering out towards the lights. Note useless expanded aluminum on front.
 All that's left to do is the skid plate. You've come this far to build a bumper if that's all you originally planned on, spend the extra few minutes and do this too. It's so worth it.
 I've got a big piece welded to a smaller piece at a 45 degree angle, to match the angle at the front (welded because if you've ever tried to bend a piece of 3/16" plate this wide, you know that its impossible without an industrial metal shop with a massive brake.)


 When I did this originally, I had neither a crossbar, nor reinforcement, and I ended up bending the 45 degree section in somewhat due to hard driving. This remedied that situation. With the tabs on there, it's just 6 bolts and she sits on the frame really nicely:
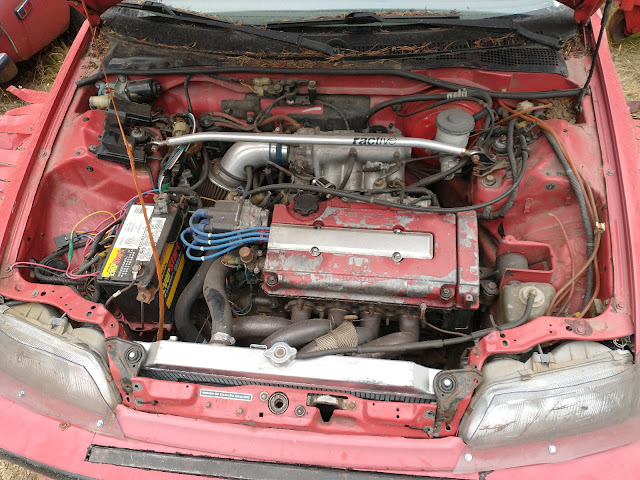
 I would never recommend welding the plate right to the frame, it's more than strong enough this way, and 6 bolts to access pretty much everything vs taking the entire thing off is very nice. The 30 year old twin cam burns enough oil that it's basically self-changing, but it's nice to have easy access to the filter for the odd replacement.

 That's looking much sturdier!
 I lost a little more approach angle than I would have liked to, but for this particular build, I was reusing parts, not building from scratch which would have netted me better angles. If your car doesn't have a front crossmember to clear and you end up attaching to tow hooks instead you could probably get away with an even better approach angle too.


 To start off, we got some nice thick pieces of plate and traced the bolt hole pattern from the stock tow points on them, drilled them out, and bolted them to the car, dangling down ready to be welded to. I should take a second here to bring up that this specific skid plate was built for exclusively RallyCross, not for general offroading, and we were limited on time so simplicity was top of mind and not a lot of attention was paid to things like approach angle. With some more time, EGs EKs and vehicles based on those chassis' can get considerably improved approach angles, compared to something like an EF.
 The drop allows the tubing coming forward a little bit of space between it and the bottom of the oil pan, giving the plate itself a little room to flex upwards (See the picture of my red painted skid plate above for how much they flex with enough hard hits) without impacting the oil pan and removing the point of a skid plate.
 And that was it for this frame! He didn't need provisions for a winch, and he was desiring to keep his front bumper and bumper cover intact, so we kept it low profile and didn't come up with the frame and tie it into the front bumper supports. Here is a couple pics with the sheet of aluminum he purchased bolted up to it, top and bottom.

 One of the benefits of using aluminum as a skid plate vs steel is when it comes time to fasten it to the frame, carriage bolts are your friend. You can simply match drill holes through the frame and plate (Making sure that they dont stick up into any parts you don't want them near, more on that later) and then pop the plate off, drill the hole in the aluminum slightly larger, and tighten a carriage bolt in from the top side. The steel bolt is much harder than the soft aluminum and will deform the slightly larger hole into a nice square hole that matches the carriage bolt and leaves nothing but a smooth rivet style head under that shan't catch on anything.

 You can see very well in this last picture how much higher the front cross brace could be if you need extra approach angle, almost 2 whole inches higher without modifying the stock rad support and if you are willing to put a different style rad in and cut the stock rad support out, you could put it even higher, further increasing your approach angle. Please note that no matter the approach angle, you won't be getting any additional ground clearance by doing this, the arms still need to be low enough to provide clearance between the oil pan and the plate itself. The specific dimensions of this frame were chosen to provide maximum coverage and strength. Your mount point choices at the back of the engine bay are limited in how much adjustability the have as the frame rails are fairly narrow, and this angle was chosen so that it would clear the oil pan, and sit on the mount point for the lower control arms, giving it some additional strength along the long run between the front and rear mounts. For additional strength, you could actually weld some additional reinforcement down, and run a longer bolt through the lower control arm mount, tying the skid plate frame into the K frame of the vehicle as well.
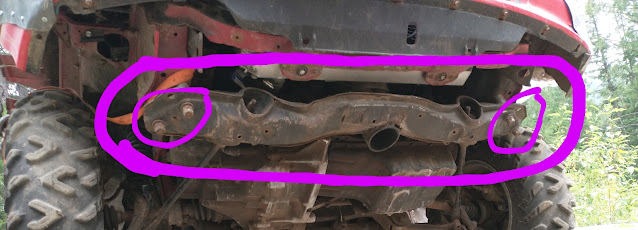
Step 1 is to identify the weak areas that you need to protect with your skid plate. On my car (a 1990 Honda civic hatchback) they are these:

Top of the pic is the radiator support. I see a lot of folks with otherwise impressive looking bumpers failing to protect this area and it always makes me wince. Aside from the oil pan, this is the most fragile part of your Honda. One good hit with a stick or rock and you are having a bad day. Ask me how I know.
Below that I have the (thin, steel) oil pan and the (relatively thick, but cast aluminum) transmission case, and the slightly sturdier but very important ears on the K member where the front lower control arms connect.
Step 2, identify the strongest areas on the front of your car which you can attach things to. Starting at the middle, you have the "frame rails" that are molded into the unibody in the floor pans:


Next toward the front, on my car (some newer Honda's don't have these, YMMV; if you don't, read on to the next one) the front crossmember which is bolted with 4 substantial bolts to the front "frame":

If you don't have a front crossmember, your tow hooks are bolted to very substantially reinforced points on the "frame":

And lastly, right at the front, your stock bumper mount points (covered up in this photo by a stupid chunk of aluminum square tubing cause I forgot to take a pic with the bumper off. You get the idea.)(Please don't mind the torn sheet metal from when I ripped the tow hook clean off trying to recover Deathwagon from a snowbank.):
None of these points by themselves are strong enough to build anything decent from, but taken together, they make a nigh-indestructible set of mounts on which to build your dreams.
Now that you know WHERE the strong and weak points are, let's actually build something.
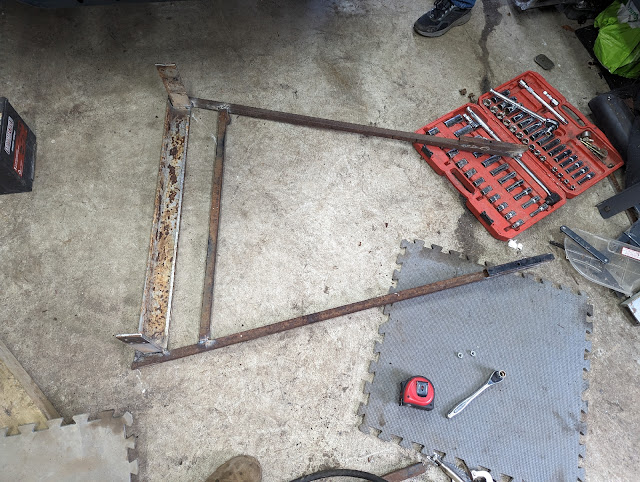
I like to start out with a frame built from square tube that looks roughly like this:

The long pieces extending towards the right bolt to the frame rails under the floor pan from the first "strong point" pictures. I use 3 bolts in each as this point is under a lot of stress when you are bagging your vehicle down the trails and hit something, and this is the only spot where you are drilling into the car itself instead of attaching to pre threaded holes.
The long piece of tube is put in place, and match drilled up through both pieces of sheet metal that make the floor pan, along with a top plate made from 3/16" or whatever scrap you have laying around:

Doing this creates a "sandwich" that spreads the clamping force of the 3 bolts out between the square tube on the bottom and the plate on the top. It makes for a very strong connection even though there were no holes there previously.
Bolt that tubing up (now feels like a good time to mention that I love 1.25" square tubing. I don't have any firm data about that, but 1" just feels too small and weak and 1.5" feels way too big and heavy. And one of my life's mottos is "there's no such thing as overkill") with it running forward you get to choose your second mount:
For my EF, the front crossmember was a no-brainer, it's solid and lined up perfectly for me, again YMMV. I just welded a small piece of angle right to the crossmember, match drilled the works, ran a bolt through, and welded the nut to the angle:

If you don't like that option (or don't have a front crossmember!) Then, as you can see, the stock tow points offer a promising alternative instead. Either get some plate and drill the hole pattern into it, or just weld some square tubing right to the tow points, down, and to those long pieces that you have running forward:

Now you've got a nice sturdy base, measure so an angled up piece just barely misses your rad support (I was reusing Deathwagon, my first offroad civic's skid plate frame for this install, so it didn't work out perfect, but you want this as close to the rad support as you can without touching, this will help with your approach angle)
This piece is arguably even more important than the skid plate that covers your oil pan, as when you smash into something at speed, it deflects the front of your car up and over the obstacle. I chose a 45 degree angle for this and I am pretty happy with that angle.
Here is the skid plate I've been using on Deathwagon. Look at the scratch pattern for proof that this angled front piece is so important.

With those welded on, extend them up so that when you cut them, a piece welded straight up will clear your crossbar attached to the bumper mounts. At this point you have a decision to make. You going for a slightly mangled OEM look or totally custom front bumper? If you are going for that totally custom bumper look, go ahead and unbolt your stock bumper, and bolt up a piece of square tubing or something to the bumper mounts like so (aluminum tubing 0/10 do not recommend. Get some steel instead.)


Now, if you decided to do a custom bumper, now's your time to go wild on it. Have the steel that you bolted to the bumper mounts extend out to the edges of the lights and weld some triangles in there, weld a winch carrier plate on (if you build a winch bumper and tie into all of these points I've mentioned, you can rest assured that you will never tear your winch bumper off from straining it too much. You will tear your car in half before your bumper tears off.)
Oh, by the way it's easy to add a massive stinger to the front of your car if you desire, just run some additional tube up from the 45 degree angle part and you can even reinforce it back to the rest of the bumper at a couple points. I may experiment with that in the future.
One thing I should note is if you decide to build your own bumper, your radiator should be protected with something. Expanded STEEL (not aluminum) welded to the frame is good, I've got some thin sheet metal with a pattern punched out of it that should flow plenty of airflow for the next bumper I do, that kind of thing. I used expanded aluminum when I first built Deathwagon and it was worthless. Looked cool, didn't offer any protection. Speaking of which, here's a pic of how this bumper was originally built:

Alright, anyways, you got your bumper and frame on and bolted up. It looks extremely loosely like this, or at least the middle part does:

Let's talk skid plate materials. You ask any offroading group and time after time everyone's answer is "old road signs, old road signs OLD ROAD SIGNS" but the truth is they SUCK. Sure they look cool but if you've made it this far down the post it's because you are looking to build something functional, not just something that looks cool.
Road signs are aluminum. (You seeing a common theme here? Aluminum isn't worth the weight savings. It's weak and hard to work with, but mostly weak) they are also very thin. They MIGHT work to keep a couple sticks from jamming into your undercarriage. But anything that was going to puncture your oil pan? Yeah, it'll puncture that sign like butter first and then make its way right through your pan. No, if you want a FUNCTIONAL skid plate, there are 2 choices: 1/8" steel plate and 3/16" steel plate. You don't need 1/4", it's too heavy. Anything thinner than 1/8" is too thin and can puncture in hard driving. Check FB marketplace or Craigslist for free scrap metal. People give it away all the time, that's where mine came from. Or go buy some bulk from a salvage yard. It's worth it. You won't regret it.
Skid plate should look something like this:

You will also notice tabs that have nuts welded on them. This is so I can bolt the skid plate to my frame from the side and not have any bolt heads to 1, catch on, and 2, get beat up by rocks and hard to get off later. I put 6 tabs total, 4 on the big plate, and 2 on the smaller one.


Those who were paying attention will remember I said I didn't weld a top crossbar for the small angle section. That's cause I had some old C channel laying around which I welded straight to the skid plate instead of welding a crossbar to the frame. I'd recommend the crossbar still, but I'm working with what I have here.


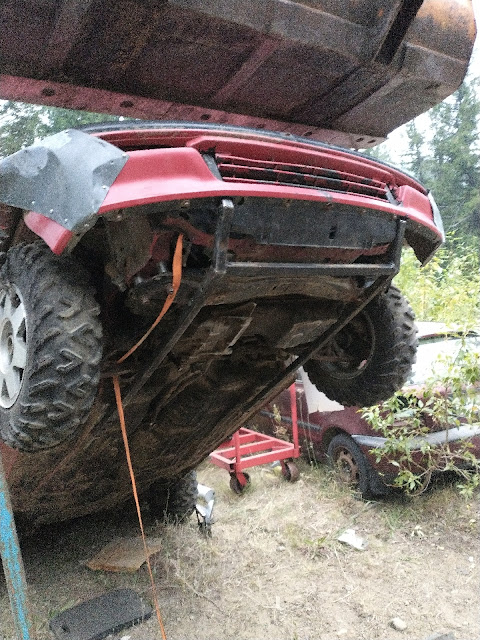
Anyway, that's it, it's all done. Here's a couple before/afters. From the front:


The protection you gain from this setup is more than worth it. Approach angle doesn't matter much when you hit whatever it is you are attempting to get over with enough momentum to carry the whole car over. This skid plate/bumper setup can handle it. I've hit 16" boulders doing 65+km/h (40mph) with not a scratch to anything besides the skid plate and a small dent on the fuel tank. I've hit water bar after water bar doing about those speeds (I would estimate 45+ water bars over Deathwagon's lifespan so far) with no damage to the car. I've smashed snowbanks at 80km/h (50mph) that were mostly ice banks to jump Deathwagon and the skid plate deflected me up and over, before landing nose first on, you guessed it, the skid plate. No damage. This truly is an indestructible build.
Oh, and when you are stuck or working on you car/changing tires, you've got the most convenient jack points ever on the car, so long as you aren't an idiot like me and cover them with a plastic bumper.

(You can also put a regular floor jack or scissor jack ANYWHERE under that skid plate and lift without damaging anything.)
Since writing this guide, I've used the red civic shown here for two full seasons of hard, hard competitive RallyCross and the skid plate has done a truly miraculous job at keeping the front mechanicals safe. At some point I painted it red to match the car, and here are a couple pictures showing just how much damage it's saved the car from: (plate and frame are off as the car is down for an overhaul presently)
Anyways, I hope you enjoyed the read, or at least the pictures, and maybe even that you learned something.
Stay frosty, friends.
UPDATE: SKID PLATE 2 ELECTRIC BOOGALOO, EK VERSION.
Not too long ago a new RallyCross friend came by desiring to build a strong skid plate for his EK coupe RX car. He had already purchased some aluminum so it was too late for me to get to him with the gospel of steel skid plates, but at the very least we could build him a nice strong frame to bolt that aluminum to. And, since I had never built a skid plate for an EK before, I figured this would be prime time to demonstrate some of the ideas I mentioned above.
EKs are a little different than EFs in that the frame rails molded into the unibody that I mentioned above are much more inboard on the EKs, and they have no front crossmember on which to mount the front of the skid plate bracket, so this skid plate looks a little different, but the process is exactly the same. Here is how we ended up doing it, and an apology for the way the steel looks, every piece came out of my scrap metal pile.
Anyways, with those tow point plates dangling down I got a piece of scrap C channel, trimmed the back C part away turning it into a large piece of angle iron and welded it across. This formed the basis for the front mount. That done, we ran some square tubing back to the same points I referenced at the very beginning of this guide, the frame rails molded into the unibody. The way that the EK is built, you either need to bend or cut a dogleg into the rear mounts, or do what we did (since the piece of aluminum he got was full length back) and just stack a spacer between the unibody and the tubing going forward. We found 1" square tubing worked great, YMMV.
With the tube run forward and tied into the front mount, we put one extra piece of tubing back from the forward mount for additional strength, just before the header. If you were building an offroad focused rig where approach angle really mattered, you could shorten the length of the plates from step 1 and either bend or cut and weld back together the tubing coming forward to make the start of a bevel, and in this case, you would really want this reinforcement bar as the majority of the impacts would be against this point.
For this plate, we were able to bolt the plate right to the frame and then I crawled under the car and bench pressed it into place while my friend tossed the bolts in all the right holes and tightened them down. If you are working alone, I strongly recommend taking the plate off, installing the frame, and then bolting the plate in place.
Here it is, all bolted into the car. I haven't got a proper press brake with which to bend metal, nor do I have the means to weld aluminum back together, so to get the little upward bend, I slotted the end of the plate in a gap in my box truck's lift gate and just pushed the frame as hard as I could until I got a little curve in it. Its not perfect but every impact will bend it slightly more upwards, hopefully, and the very chunky angle will protect the rad support.
Again, if you are building a more offroad focused machine, I would strongly advise running some additional tubing up and to the front bumper mounts as well to increase the strength of everything, but as a rally sport plate, this is already overkill (if there were such a thing)
And that's it! That's where we end until I build another plate for another roughly similar Honda!
And until then, as always, stay frosty friends.
Comments
Post a Comment